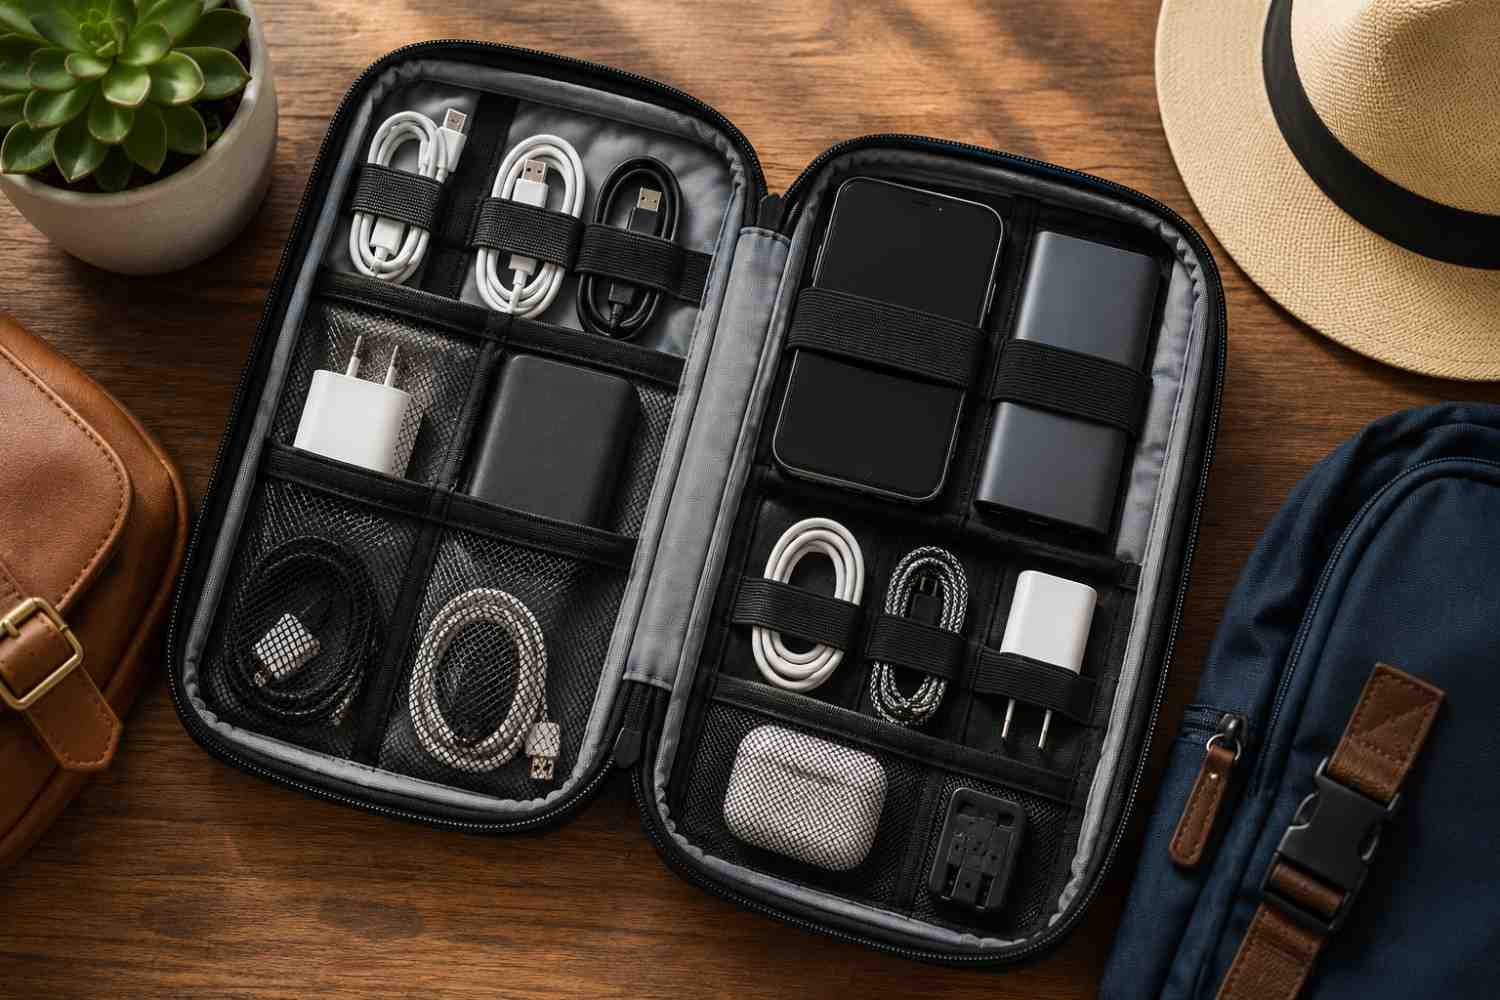
Traveling with today’s technology often means carrying far more than just a smartphone. Chargers, power banks, earbuds, USB cables, adapters, smartwatches, tablets, and other electronic accessories can quickly create clutter inside a backpack, carry-on, or suitcase. Whether you’re heading out for a weekend getaway, a business trip, or an extended vacation, keeping these items organized can save time and reduce frustration. Building your own EMF travel organizer is an affordable and enjoyable project that helps keep everything in one convenient place while allowing you to customize it to fit your travel style.
Although many travelers are interested in reducing unnecessary exposure to electronic devices during trips, organization is equally important. A dedicated organizer encourages you to store your electronics neatly, avoid tangled cables, and quickly locate the accessories you need. Best of all, creating your own organizer gives you complete control over the layout, materials, and features without spending a fortune on a pre-made solution.
What Is an EMF Travel Organizer?
When people hear the phrase “EMF travel organizer,” they may picture a specialized travel case filled with high-tech accessories. In reality, it can be much simpler than that. An EMF travel organizer is simply a storage system designed to hold the electronic devices and accessories you regularly carry while traveling. The emphasis is on keeping everything together in an organized, easy-to-access location.
Unlike a standard toiletry bag or random zippered pouch, a dedicated organizer separates different items into designated compartments. Your charging cable doesn’t end up wrapped around your earbuds, your portable battery isn’t bouncing against your phone screen, and your adapters aren’t buried somewhere at the bottom of your backpack.
Many travelers appreciate having one location that contains everything related to their electronics. Instead of searching through multiple bags before boarding a flight or checking into a hotel, they can simply unzip one case and immediately find exactly what they need.
An organizer can include space for:
- Smartphones
- Charging cables
- USB adapters
- Portable battery packs
- Wireless earbuds
- Travel adapters
- Small notebooks
- Stylus pens
- SIM card tools
- Cleaning cloths
- EMF-related accessories you personally choose to carry
The beauty of a DIY project is that no two organizers have to look alike. You decide what belongs inside based on your own travel habits.
Why Build Your Own Instead of Buying One?
Walk through any electronics store or browse online marketplaces, and you’ll find dozens of travel organizers available for purchase. Some are excellent, while others include compartments you’ll never use or leave out features that matter most to you. Creating your own organizer solves many of these problems while adding a personal touch.
One of the biggest advantages is customization. If you typically travel with two charging cables instead of six, your organizer can reflect that. If you carry a compact tablet along with your phone, you can design a larger compartment specifically for it. Every traveler has slightly different needs, making a personalized layout much more practical than a one-size-fits-all solution.
Building your own organizer also allows you to reuse materials you may already have at home. An unused camera bag, a zippered pencil case, a cosmetic pouch, or even a small tool organizer can become an excellent foundation. With just a few inexpensive supplies, you can create a storage system that performs just as well as many commercial products.
Cost is another benefit. Rather than purchasing a premium organizer with features you may never use, you can invest only in the materials that actually improve your setup. Even if you decide to purchase a quality organizer as your starting point, customizing the interior often produces a much more useful travel companion.
Finally, many people simply enjoy DIY projects. There’s satisfaction in building something practical that you can use for years while knowing every compartment was designed specifically for your own equipment.
Supplies You’ll Need
Before starting your project, spend a few minutes gathering your materials. Fortunately, this is one of those DIY projects that doesn’t require expensive tools or specialized skills. Most supplies can be found around the house or purchased inexpensively.
The exact materials will depend on how elaborate you want your organizer to be. Some people prefer a simple zippered pouch with a few elastic bands inside, while others enjoy creating multiple storage sections using foam inserts, mesh pockets, and dividers.
Common supplies include:
- A zippered travel case or electronics organizer
- Adhesive-backed hook-and-loop strips
- Elastic bands for securing devices
- Thin foam sheets for padding
- Mesh zipper pouches
- Small cable ties or reusable Velcro straps
- Double-sided fabric tape or fabric glue
- Scissors
- Measuring tape
- Optional labels or luggage tags
As you gather your supplies, remember that simplicity often works best. An organizer overloaded with compartments can become just as difficult to use as a messy backpack. Focus on making each section functional rather than trying to include every possible feature.
If you don’t already have a suitable case, a quality electronics organizer makes an excellent starting point for customization.
One practical option is an Electronics Travel Organizer Case available on Amazon.
Rather than purchasing the first one you see, compare compartment layouts and dimensions to make sure it matches the devices you actually travel with.
Step-by-Step: Build Your DIY EMF Travel Organizer
The best organizers aren’t necessarily the largest ones. Instead, they’re carefully planned so every item has a logical home. Before attaching pockets or cutting foam, spend a little time deciding exactly how you’d like everything arranged.
Step 1: Lay Out Every Item You Normally Travel With
Begin by placing all of your travel electronics on a table. This step often surprises people because they discover they’re carrying far more accessories than they realized.
Separate everything into categories such as charging equipment, communication devices, cleaning supplies, adapters, and miscellaneous accessories. Seeing everything together makes it easier to determine how much storage space you’ll actually need.
You may also discover duplicate items that can stay at home. Perhaps you’re carrying three charging cables when two would be sufficient or packing adapters you’ve never used.
This process naturally simplifies your travel routine before you even begin building the organizer.
Step 2: Choose a Logical Layout
Once you’ve identified everything you plan to carry, arrange the items on top of your organizer before permanently securing anything.
Think about which items you’ll access most frequently. Your phone charging cable should probably be easy to reach, while a SIM removal tool can remain tucked into a smaller pocket since it’s rarely needed.
Many travelers find it helpful to group similar items together. Chargers stay with charging cables. Audio accessories stay together. Cleaning supplies remain in another section. This organization reduces the amount of searching required whenever you need something quickly.
Leave a little extra room between larger items so the organizer closes comfortably without placing pressure on delicate electronics.
Step 3: Secure Larger Devices First
Phones, battery packs, and portable hard drives are usually the largest items inside an electronics organizer. Start by creating secure locations for these devices before worrying about smaller accessories.
Elastic straps work especially well because they hold devices firmly while allowing quick removal. Thin foam padding underneath heavier electronics provides additional protection during travel.
If you’re using adhesive hook-and-loop strips, test their placement several times before permanently attaching them. A few extra minutes spent planning now can prevent frustration later if you decide to rearrange the layout.
Many travelers who prioritize organization also choose protective accessories for frequently handled electronics. If you’re interested in combining organization with device protection, DefenderShield Phone Cases are available.
Whether or not you choose to use a specialized phone case, placing your phone in its own dedicated section helps reduce scratches from loose cables, keys, or metal adapters.
Step 4: Organize Your Cables
Loose charging cables have a way of becoming tangled almost immediately after being placed inside a bag. Fortunately, they’re also among the easiest items to organize.
Wrap each cable using a loose circle rather than tight loops that may stress the wire over time. Secure them with reusable cable ties or small hook-and-loop straps before placing them into individual mesh pockets or elastic loops.
If multiple cables look similar, consider using different colored cable ties or small labels so you can identify them quickly without pulling each one out.
Keeping cables neatly wrapped not only makes your organizer look cleaner but also helps extend the lifespan of the cables themselves.
Step 5: Create a Dedicated Charging Station Section
One of the most useful features you can add to your organizer is a section devoted entirely to charging equipment. Rather than scattering wall adapters, USB hubs, and charging bricks throughout different compartments, keeping them together makes packing and unpacking much faster.
Think about what you actually use during a typical trip. A weekend getaway may only require one wall charger and a USB-C cable, while an international vacation might require multiple adapters, a power bank, and charging cables for several devices.
If your organizer has elastic loops, position the larger charging brick so it stays firmly in place without pressing against your phone or tablet. Smaller adapters can fit into mesh pockets where they’re easy to see without emptying the entire case.
Many travelers also like to keep a small card listing which charger belongs to which device. This may sound unnecessary until you’re packing late at night before an early flight. A quick glance at your checklist can help prevent accidentally leaving behind an essential charging cable.
Step 6: Add a Pocket for Everyday Essentials
Travel electronics often include more than devices and cables. Small accessories can easily disappear if they aren’t stored properly, so it’s helpful to dedicate one compartment to frequently used travel items.
This pocket might include:
- A microfiber cleaning cloth
- A small notebook and pen
- A SIM card removal tool
- USB flash drive
- SD or microSD card holder
- Spare earbuds
- Screen cleaning wipes
- A luggage tag
- A few adhesive cable clips
Keeping these smaller accessories together prevents them from getting lost among larger electronics. It also means you’ll know exactly where to look whenever you need them.
A zippered mesh pocket works particularly well because you can see everything inside without opening multiple compartments.
Step 7: Leave Room for Future Changes
Many people make the mistake of filling every available inch of space. While it may look satisfying at first, a completely full organizer leaves little flexibility for future trips.
Technology changes over time. You may eventually purchase new earbuds, replace your phone, add another charging cable, or start traveling with a tablet. Leaving one or two empty compartments gives your organizer room to grow without requiring a complete redesign.
A little extra space also makes packing easier. Instead of forcing the organizer closed every time you zip it, you’ll have room for slightly bulkier charging cables or a few additional accessories when needed.
Remember, the goal isn’t to fit as many gadgets as possible. The goal is to make traveling simpler.
Items Worth Including in Your Organizer
Every traveler packs differently, but there are certain items that prove useful on almost every trip. Before finalizing your organizer, think about the situations you commonly encounter while traveling. Waiting in airports, working from hotel rooms, taking road trips, or commuting for business may all require different equipment.
Rather than carrying dozens of gadgets “just in case,” focus on packing items that you know you’ll actually use.
Many travelers include:
- Smartphone
- Charging cable
- Fast wall charger
- Portable battery pack
- Wireless earbuds
- Smartwatch charging cable
- USB-C adapter
- Lightning adapter (if needed)
- Microfiber cleaning cloth
- Flash drive
- International plug adapter (when traveling abroad)
- SIM card tool
- Small notebook and pen
- Business cards
- Travel documents stored separately from electronics
As your travel habits change, don’t hesitate to update your organizer. A DIY project is never truly finished. It can evolve as your needs change over time.
Optional EMF Accessories for Travel
Many readers of EMFLuLu are interested in practical ways to organize their electronics while also incorporating products that align with their personal preferences regarding EMF awareness. Although scientific research into EMF exposure continues to develop, some travelers choose to include products designed to complement their overall travel setup.
The important thing is to choose products because they fit your travel routine—not simply because they’re advertised as must-have accessories.
If you’re interested in adding a few optional items to your organizer, these products may be worth exploring.
For smartphone protection, many travelers choose the DefenderShield Phone Case.
If you often travel with a laptop, you may also want to look at DefenderShield Laptop Shields.
For readers who like measuring radio frequency signals around their home or while traveling, Safe Living Technologies RF Meters are great options.
Some travelers are also interested in learning more about the mobile device products offered by EMF Harmony.
These products are entirely optional additions. Your organizer will still be highly useful even if it simply keeps your electronics neat, protected, and easy to access.
Affiliate Advertisement

Tips for Keeping Your Organizer Neat
Building your organizer is only the first step. Keeping it organized during months or years of travel is where the real value comes from.
Fortunately, maintaining your organizer takes only a few minutes after each trip. A small amount of regular attention prevents clutter from gradually returning.
Here are several habits that many organized travelers follow:
Instead of throwing charging cables back into the case, wrap them neatly before storing them. This small habit keeps cords from tangling and reduces wear on the connectors.
Recharge portable battery packs as soon as you return home. Waiting until the night before your next trip often leads to forgotten equipment or partially charged devices.
Remove anything you no longer use. Old adapters, damaged cables, expired travel documents, or outdated accessories only add unnecessary bulk.
Wipe down electronics occasionally using a microfiber cloth. Dust and fingerprints build up surprisingly quickly during travel.
Review your organizer every few months. You may discover that certain accessories never leave their compartments while others are used constantly. Rearranging the layout based on actual experience can make the organizer even more practical.
Choosing the Right Size Organizer
One question many DIY enthusiasts ask is how large their organizer should be. The answer depends less on the number of electronics you own and more on how you prefer to travel.
If you typically take short weekend trips with only a smartphone and charger, a compact organizer is probably all you’ll ever need. It slips easily into a backpack or personal item and takes up very little room.
Business travelers often benefit from a medium-sized organizer with dedicated storage for presentation accessories, external drives, charging equipment, and multiple cables.
Families may prefer larger organizers capable of holding charging equipment for several people. This prevents multiple loose chargers from accumulating throughout suitcases and makes it easier to locate everything at the hotel.
Regardless of size, avoid purchasing an organizer simply because it’s the biggest available. Extra space often encourages unnecessary packing. A properly sized organizer helps you stay focused on bringing only what you’ll actually use.
Common Mistakes to Avoid
Even a well-designed organizer can become frustrating if a few common mistakes creep into your packing routine. The good news is that most of these issues are easy to prevent with a little planning. By avoiding a handful of habits, your DIY organizer will remain useful for years instead of becoming another cluttered pouch at the bottom of your suitcase.
One mistake is choosing an organizer that is too small. It may seem like a good way to save space, but if every compartment is packed tightly, you’ll spend more time trying to fit everything inside than actually enjoying the convenience of being organized. On the other hand, an organizer that is much larger than necessary encourages overpacking and can make it difficult to find smaller accessories.
Another common problem is carrying duplicate items that aren’t needed. Many travelers unknowingly pack three or four charging cables for the same device or multiple wall adapters “just in case.” Before every trip, take a quick inventory and remove anything that doesn’t have a clear purpose.
It’s also important to avoid wrapping charging cables too tightly. Sharp bends can place unnecessary stress on the internal wiring, eventually shortening the life of the cable. Using loose loops secured with reusable hook-and-loop straps helps keep cables organized while reducing wear.
Many people overlook the importance of cleaning their organizer. Crumbs, dust, sand, and lint can accumulate surprisingly quickly, especially if the organizer travels inside backpacks or carry-on luggage. Every few months, empty the case, wipe down the interior with a damp microfiber cloth, and remove any debris hiding in corners or mesh pockets.
Finally, don’t wait until the night before your trip to organize your electronics. Giving yourself a day or two allows time to charge batteries, replace worn cables, and confirm that every accessory is working properly before you leave home.
Who Benefits Most from a DIY EMF Travel Organizer?
Although almost anyone who carries electronics can benefit from better organization, some travelers may find a dedicated organizer especially helpful. The more devices you carry, the more valuable it becomes to know exactly where everything is.
Business travelers often carry laptops, phones, charging equipment, presentation accessories, flash drives, and headphones. Keeping everything together makes airport security, hotel check-ins, and client meetings much smoother.
Students traveling between school and home frequently carry tablets, laptops, charging cables, calculators, and portable storage devices. A dedicated organizer helps protect these items while reducing the chances of forgetting an essential accessory.
Families can also benefit from a shared organizer. Instead of searching through multiple bags for a charging cable that fits a child’s tablet or a spouse’s phone, one organized case keeps commonly used electronics together.
Road trip enthusiasts often appreciate having charging equipment easily accessible inside the vehicle. Rather than digging through luggage during rest stops, they can simply reach for one organized case containing everything they need.
Campers and RV travelers also tend to carry portable batteries, flashlights, charging adapters, and other small electronics that benefit from organized storage.
Even commuters who travel to work every day can appreciate the convenience of having chargers, earbuds, and small accessories stored neatly inside one compact organizer.
Personalizing Your Organizer
One of the greatest advantages of building your own organizer is that it reflects your individual travel style. No commercial product knows exactly what you carry or how you prefer to pack, but a DIY organizer can be tailored to fit your routine perfectly.
Some people like labeling individual compartments with small tags identifying chargers, audio equipment, or travel documents. Others prefer using different colored cable ties to quickly distinguish one cable from another.
You might decide to sew additional elastic loops into the organizer for better cable management or attach a zippered mesh pocket for passports and travel receipts. Some travelers even include a laminated packing checklist that reminds them to verify each item before leaving home.
As your technology changes, your organizer can change with it. New phone? Simply adjust the elastic straps. Purchased a new battery pack? Rearrange a compartment. The flexibility of a DIY project means you aren’t locked into the layout chosen by a manufacturer years earlier.
Small improvements over time often make the organizer more useful than trying to create the “perfect” design from the very beginning.
Final Thoughts
Creating your own EMF travel organizer is a simple weekend project that can make every trip a little more organized and a lot less stressful. Instead of digging through backpacks, suitcases, or glove compartments searching for a charging cable or adapter, you’ll know exactly where everything is stored.
The best organizer isn’t necessarily the most expensive or the one with the greatest number of compartments. It’s the one that matches your travel habits, protects your electronics, and makes your routine easier. Whether you travel for work, family vacations, weekend road trips, or daily commuting, a personalized organizer can save time, reduce clutter, and help keep your essential devices ready whenever you need them.
As your travel needs evolve, don’t hesitate to update your organizer with new compartments, improved cable management, or different accessories. One of the greatest strengths of a DIY project is that it grows with you. With a little planning and creativity, your EMF travel organizer can become one of the most practical pieces of travel gear you own.
Before You Go…
Get Weekly EMF Protection Tips
Enjoy this article? Join the EMFLuLu newsletter for simple weekly tips to reduce everyday EMF exposure from phones, WiFi routers, laptops, and smart home devices.
Try Our Free EMF Calculators
Curious how much EMF exposure you may experience each day?
These simple tools can help you estimate your exposure and identify possible problem areas in your home.
Try these free calculators:
Like this article? Pin it on Pinterest!

More to Explore