
As our homes fill with smartphones, tablets, routers, Bluetooth gadgets, smartwatches, and countless wireless accessories, people are becoming more aware of how much electromagnetic activity surrounds them every day. Whether your goal is to protect sensitive data, secure emergency electronics during solar storms, or simply reduce how much radiation small devices emit into your living space, building a Faraday cage can be a surprisingly simple and affordable solution.
In this guide, you’ll learn how to build a DIY Faraday cage for small electronics at home using inexpensive materials you probably already own. You’ll also see how to test your design, upgrade it for better shielding, and decide when a professional, commercial-grade solution – like DefenderShield’s shielding accessories or EMF-Harmony’s harmonizing technology – might be a better option.
What a Faraday Cage Does – And What It Doesn’t
A Faraday cage works by surrounding a device with conductive material that redistributes electrical charge across its surface. When done correctly, electromagnetic fields can’t penetrate the enclosure, which blocks signals such as:
This kind of shielding is ideal for:
- Protecting emergency electronics from extreme solar activity
- Storing devices you want to isolate from wireless networks
- Preventing key fob hacking
- Reducing EMF fields inside your home
- Protecting small electronics from data theft or interference
However, a Faraday cage is not the same thing as personal EMF protection. When electronics are not inside the cage and are being actively used, they still emit EMF. That’s where devices like DefenderShield’s EMF-shielding cases or EMF-Harmony’s wearable harmonizing products make sense – they work while your devices are in use. A Faraday cage only works when the device is inside and fully sealed.
Materials for DIY Faraday Cages
Before jumping into the actual building projects, it’s important to understand the materials that work best for creating a shield. The right material makes the cage more effective and ensures that wireless signals are blocked completely.
Introduction to the Materials List
Below is a list of the most effective materials people use when learning how to build a DIY Faraday cage for small electronics at home. Before reviewing the list, keep in mind two important principles:
- Conductive material is non-negotiable. It must be metal – foil, mesh, tin, steel, or conductive fabric.
- Seams and gaps must be sealed. Even a pencil-thin gap can ruin the shielding effect.
With that in mind, here are the top materials you can use:
Aluminum Foil
How to use it:
- Wrap the object or container completely with a minimum of three layers.
- Smooth out wrinkles to prevent gaps.
- Use additional foil at the seams to strengthen weak points.
Why it works:
Aluminum foil reflects and redistributes electromagnetic charge, preventing penetration.
Metal Mesh
How to use it:
- Choose mesh with small openings (1–2 mm is ideal).
- Wrap mesh around a box or build a wire cage.
- Overlap edges and secure with conductive tape or metal clips.
Why it works:
It blocks signals while allowing airflow and visibility – popular for testable enclosures.
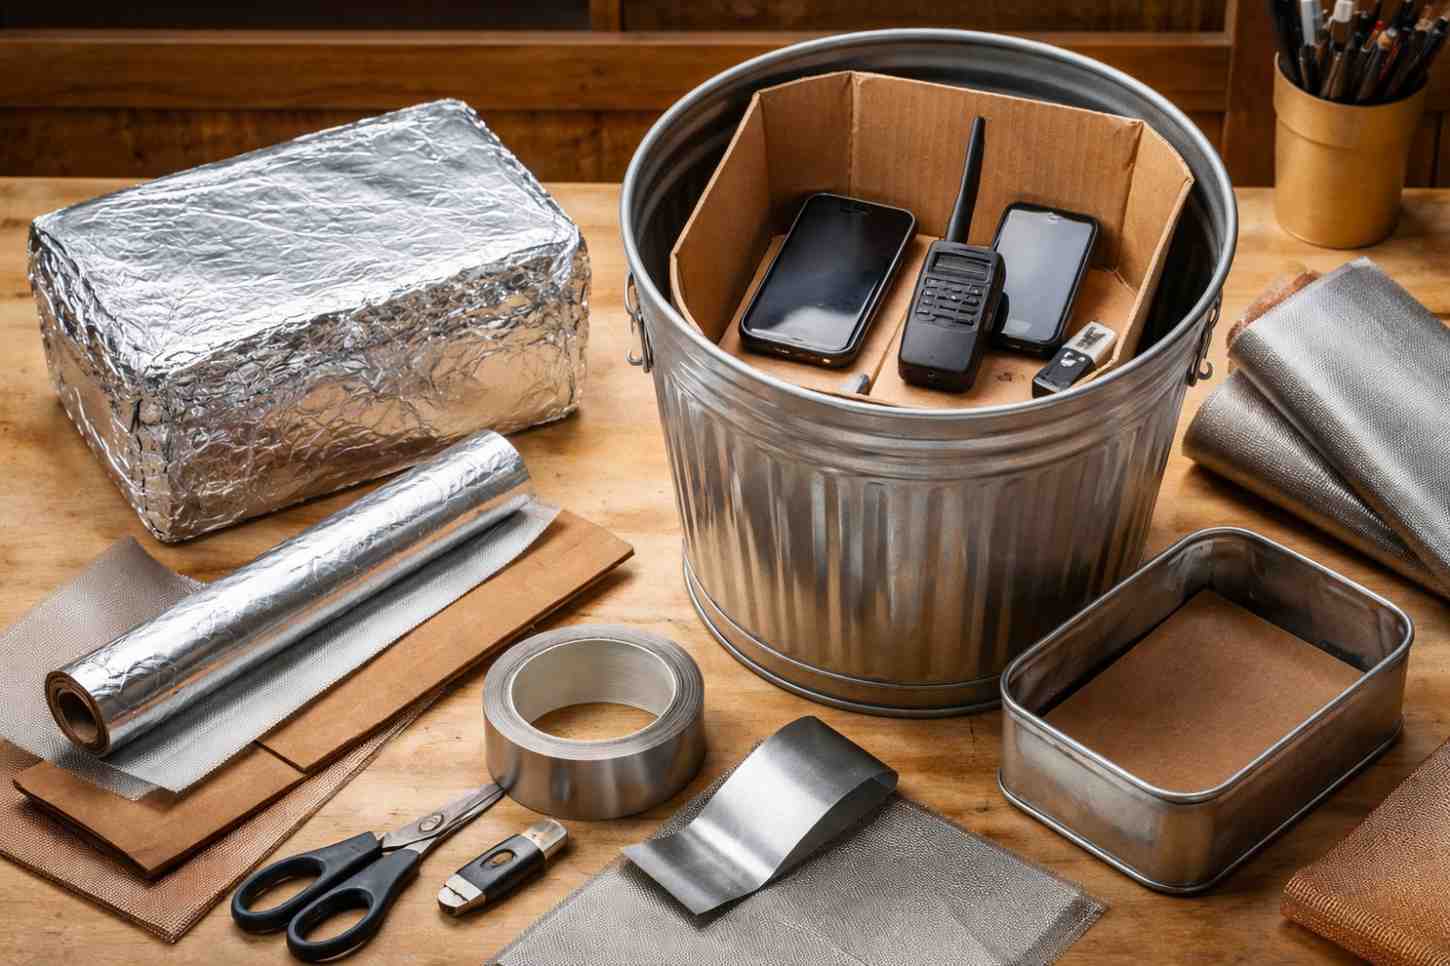
Steel Trash Can
How to use it:
- Choose a clean, unpainted metal trash can with a tight-fitting lid.
- Line the inside with cardboard or foam so devices don’t touch the metal directly.
- Seal the lid with conductive tape for better shielding.
Why it works:
It’s large, sturdy, and easy to convert into a high-performance Faraday enclosure.
Metal Cookie Tins
How to use it:
- Line the interior with cardboard to prevent direct contact.
- Secure the lid with foil tape to eliminate gaps.
- Great for key fobs, USB drives, and small phones.
Why it works:
Tight seams and solid metal construction provide excellent signal attenuation.
EMF Shielding Fabric (Professional Option)
How to use it:
- Sew a pouch or wrap a device multiple times.
- Overlap layers tightly.
- Reinforce seams with conductive tape.
DIY Faraday Cage Projects (Step-by-Step Tutorials)
These three projects are written in increasing order of complexity. Each one has clear instructions so beginners can follow along easily. Before beginning any project, you should determine which electronics you want to protect. Smaller items – USB drives, phones, radios, hard drives, key fobs – are the easiest to shield. Larger laptops or tablets may require a bigger enclosure.
Now let’s explore three ways you can learn how to build a DIY Faraday cage for small electronics at home using items you already have.
PROJECT 1: Aluminum Foil Faraday Box
Materials:
- Cardboard box or cardboard panels
- Heavy-duty aluminum foil
- Scissors
- Tape (optional)
Steps:
- Prepare the container – Find a small cardboard box that can fully close. The cardboard acts as insulation so the device doesn’t touch the foil directly.
- Apply the first layer of foil – Wrap the entire outside of the box in foil. Press firmly to remove air pockets. Ensure the foil is continuous with no tears.
- Add a second and third layer – Each new layer should wrap in a different direction—horizontal, vertical, diagonal – so seams do not align and form weak points. Tip: Overlap corners heavily.
- Seal the lid area – When closing the box, wrap foil around the lid so it becomes a continuous conductive surface with the body.
- Test it – Place a smartphone inside the closed box and attempt to call it. If it rings, add more layers.
Affiliate Advertisement

Steel Trash Can Faraday Cage
Materials:
- Clean metal trash can with tight lid
- Cardboard, foam, or rubber mat
- Conductive metal tape
- Optional: weather stripping for a tighter seal
Steps:
- Line the interior – Use cardboard or foam to cover the bottom and sides. This prevents electronics from touching the metal walls.
- Place electronics inside – Use small cardboard boxes or bubble wrap to keep items separated and cushioned.
- Close the lid – The lid must sit tightly all the way around. Gaps will weaken the shield.
- Seal with conductive tape – Run metal tape around the seam to ensure continuous conductivity. Tip: Press the tape firmly to remove air pockets.
- Test with wireless devices – Try calling a phone or sending a Bluetooth command. If successful signals get through, add a second layer of tape around the rim.
This version provides excellent shielding and is a favorite in preparedness communities.
Affiliate Advertisement

DIY Faraday Fabric Pouch
Materials:
- Conductive EMF shielding fabric
- Scissors
- Sewing machine or hand-sewing needles
- Velcro or metal snaps
- Conductive tape (optional)
Steps:
- Cut the fabric – Cut two rectangular panels large enough to hold your device, with two extra inches of margin on all sides.
- Sew the sides carefully – Sew around the edges, leaving the top open. Use small, tight stitches to avoid gaps.
- Add a fold-over flap – Design a flap that folds over the opening to block signals from escaping through the top.
- Add Velcro or snaps – Ensure the closure is tight. Gaps will allow signal leakage.
- Test for effectiveness – Place a cell phone inside, seal it, and attempt to call it.
If it rings, reinforce seams with conductive tape.
Some may prefer a ready-made pouch, in which case DefenderShield’s Faraday bags and cases are excellent all-in-one alternatives. They’re lab-tested and outperform most DIY versions.
What Electronics to Put Inside a Faraday Cage
Not all electronics need Faraday protection, but many small devices benefit greatly from being stored in a shielded enclosure. Below is a detailed list of the types of electronics people typically shield and why. This helps readers understand how to build a DIY Faraday cage for small electronics at home that’s actually useful in real-life scenarios.
Recommended Devices:
- Smartphones – Protects data or reduces EMF output while charging.
- USB drives – Keeps sensitive information secure from unauthorized access.
- Portable hard drives – Protects backups from EMP-level surges.
- Walkie-talkies and radios – Stores emergency communication devices.
- Car key fobs – Prevents signal “relay theft” used in car hacking.
- Tablets and small laptops – Useful for safeguarding travel devices.
- WiFi hotspots or small routers – Reduces EMF exposure when they’re not in use.
For personal EMF reduction when electronics are actively in use (not stored in a cage), readers may prefer EMF-Harmony wearable harmonizers, which help the body adapt to EMF stress without blocking signals.
How to Test Your DIY Faraday Cage
Testing is essential. Even a perfectly built cage can fail if a seam, gap, or fabric edge is slightly misaligned. The tests below will confirm whether your cage works and show you where improvements may be needed.
Testing Methods
- Cell Phone Test
- Turn on your phone.
- Place it inside the cage.
- Close or seal the cage completely.
- Try calling it from another phone.
If it rings, you need more layers or better seam coverage.
- WiFi Hotspot Test
- Turn on a personal hotspot.
- Put a second device inside the cage.
- If the device still connects to the hotspot, the shield is incomplete.
- Bluetooth Test
- Pair headphones or a Bluetooth device.
- Place one device inside the cage.
- If the signal persists, reinforce the structure.
- Radio Test
- Tune a small radio to AM or FM.
- Place it inside and seal the cage.
- Signal loss indicates better shielding.
When a Commercial Product Is Better Than DIY
DIY cages work well, but they have limitations – especially when precise, consistent shielding is needed. For predictable performance, commercial products excel.
Recommended Professional Options
- Phone cases
- Laptop shields
- Faraday bags
- EMF-protection accessories
Why they’re beneficial:
They use multi-layered shielding materials, tested for consistent attenuation levels.
- Wearable harmonizing devices
- Car EMF harmonizers
- Universal EMF stress-reduction tools
Why they’re beneficial:
They don’t block EMF – they harmonize it, helping your body stay balanced even while devices are in use.
Both brands offer a level of refinement, durability, and reliability that DIY cages cannot match, making them ideal complementary tools.
Conclusion
Building a Faraday cage is easier than most people imagine. With foil, mesh, metal containers, or even conductive fabric, anyone can create a functional shield that blocks wireless signals and protects sensitive electronics. Now that you understand how to build a DIY Faraday cage for small electronics at home, along with how to test and improve your design, you’re equipped to start protecting your devices and reducing unnecessary EMF exposure in simple, practical ways.
If you ever feel you need a more polished or reliable solution, DefenderShield and EMF-Harmony offer excellent next-level tools to support your EMF-protection efforts.
Before You Go…
Get Weekly EMF Protection Tips
Enjoy this article? Join the EMFLuLu newsletter for simple weekly tips to reduce everyday EMF exposure from phones, WiFi routers, laptops, and smart home devices.
Try Our Free EMF Calculators
Curious how much EMF exposure you may experience each day?
These simple tools can help you estimate your exposure and identify possible problem areas in your home.
Try these free calculators:
Like this article? Pin it on Pinterest!

More to Explore


